LED Light Frames
/ June 1, 2026
I’ve been spending a bunch of time working on finishing our basement, a project that has covered all sorts of fun DIY and home-renovation topics. This one deserves its own writeup - I’m proud of what I ended up with.
The Setup
We started with a messy concrete box and got to the point where we had a non-messy room inside the box - new subfloor, framed-in walls, a nice room inside the room. Through a combination of “we have plenty of headroom” and “I really don’t want to drywall a ceiling if I don’t have to”, we decided to install a drop ceiling. That led to trying to solve for lighting - entire ceiling tile light fixtures would have been too much, and putting can lights into a bunch of tiles wasn’t the way we wanted to go. One option that looked interesting was frame lights that sat along the edges of the ceiling grid. We liked the look of this option, but had a few complaints:
- The price for five of the commercial units felt high
- The existing wiring would be annoying to have a light switch at the top of the stairs
- I wanted the ability to do color-temperature changes, if not full RGB
Given that, well - how hard could it possibly be to make something myself?
LED Frames
I’ve done some tinkering with 5050 LEDs before, so this seemed like a project I could take a crack at. Based on info from QuinLED (lots more from them later), I went with 24v analog RGBW LEDs from BTF Lighting. The frames themselves are constructed from aluminum channel from Superlighting LED, and I was able to have them cut the channels to length with the necessary miters. The specific channel and diffuser lens I used didn’t have matching plastic connectors available, so that became the first custom part of the project.
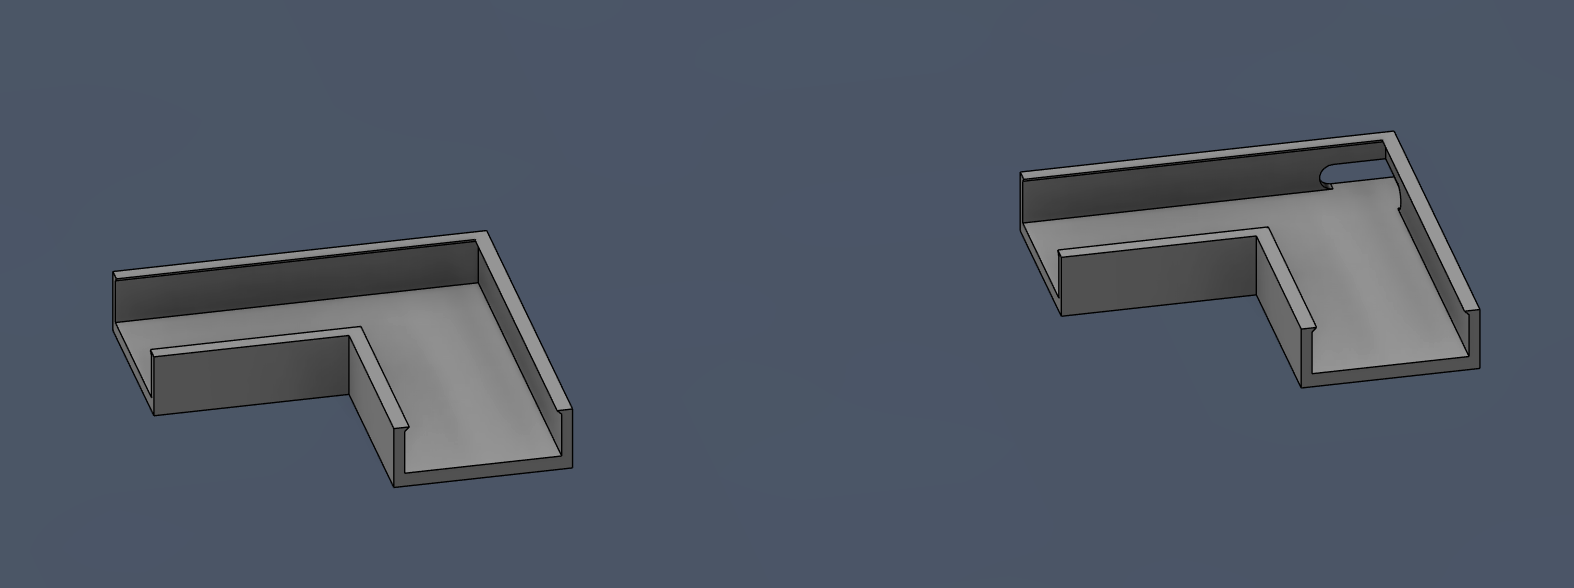
One corner for each frame unit got a cutout for running wires out of, though it turned out I didn’t make the cutout large enough. I ended up just filing them slightly larger instead of reprinting.
Physical assembly was straightforward - cut LED tape to length (60 LED/m works out almost perfectly to 36 LED/2ft, which lines up with cut points every 6 LEDs), secure LEDs to channel with double-sided tape, snap channels together with corner brackets and a bit of superglue. After that, it was time to cut a bunch of short wires and start soldering.
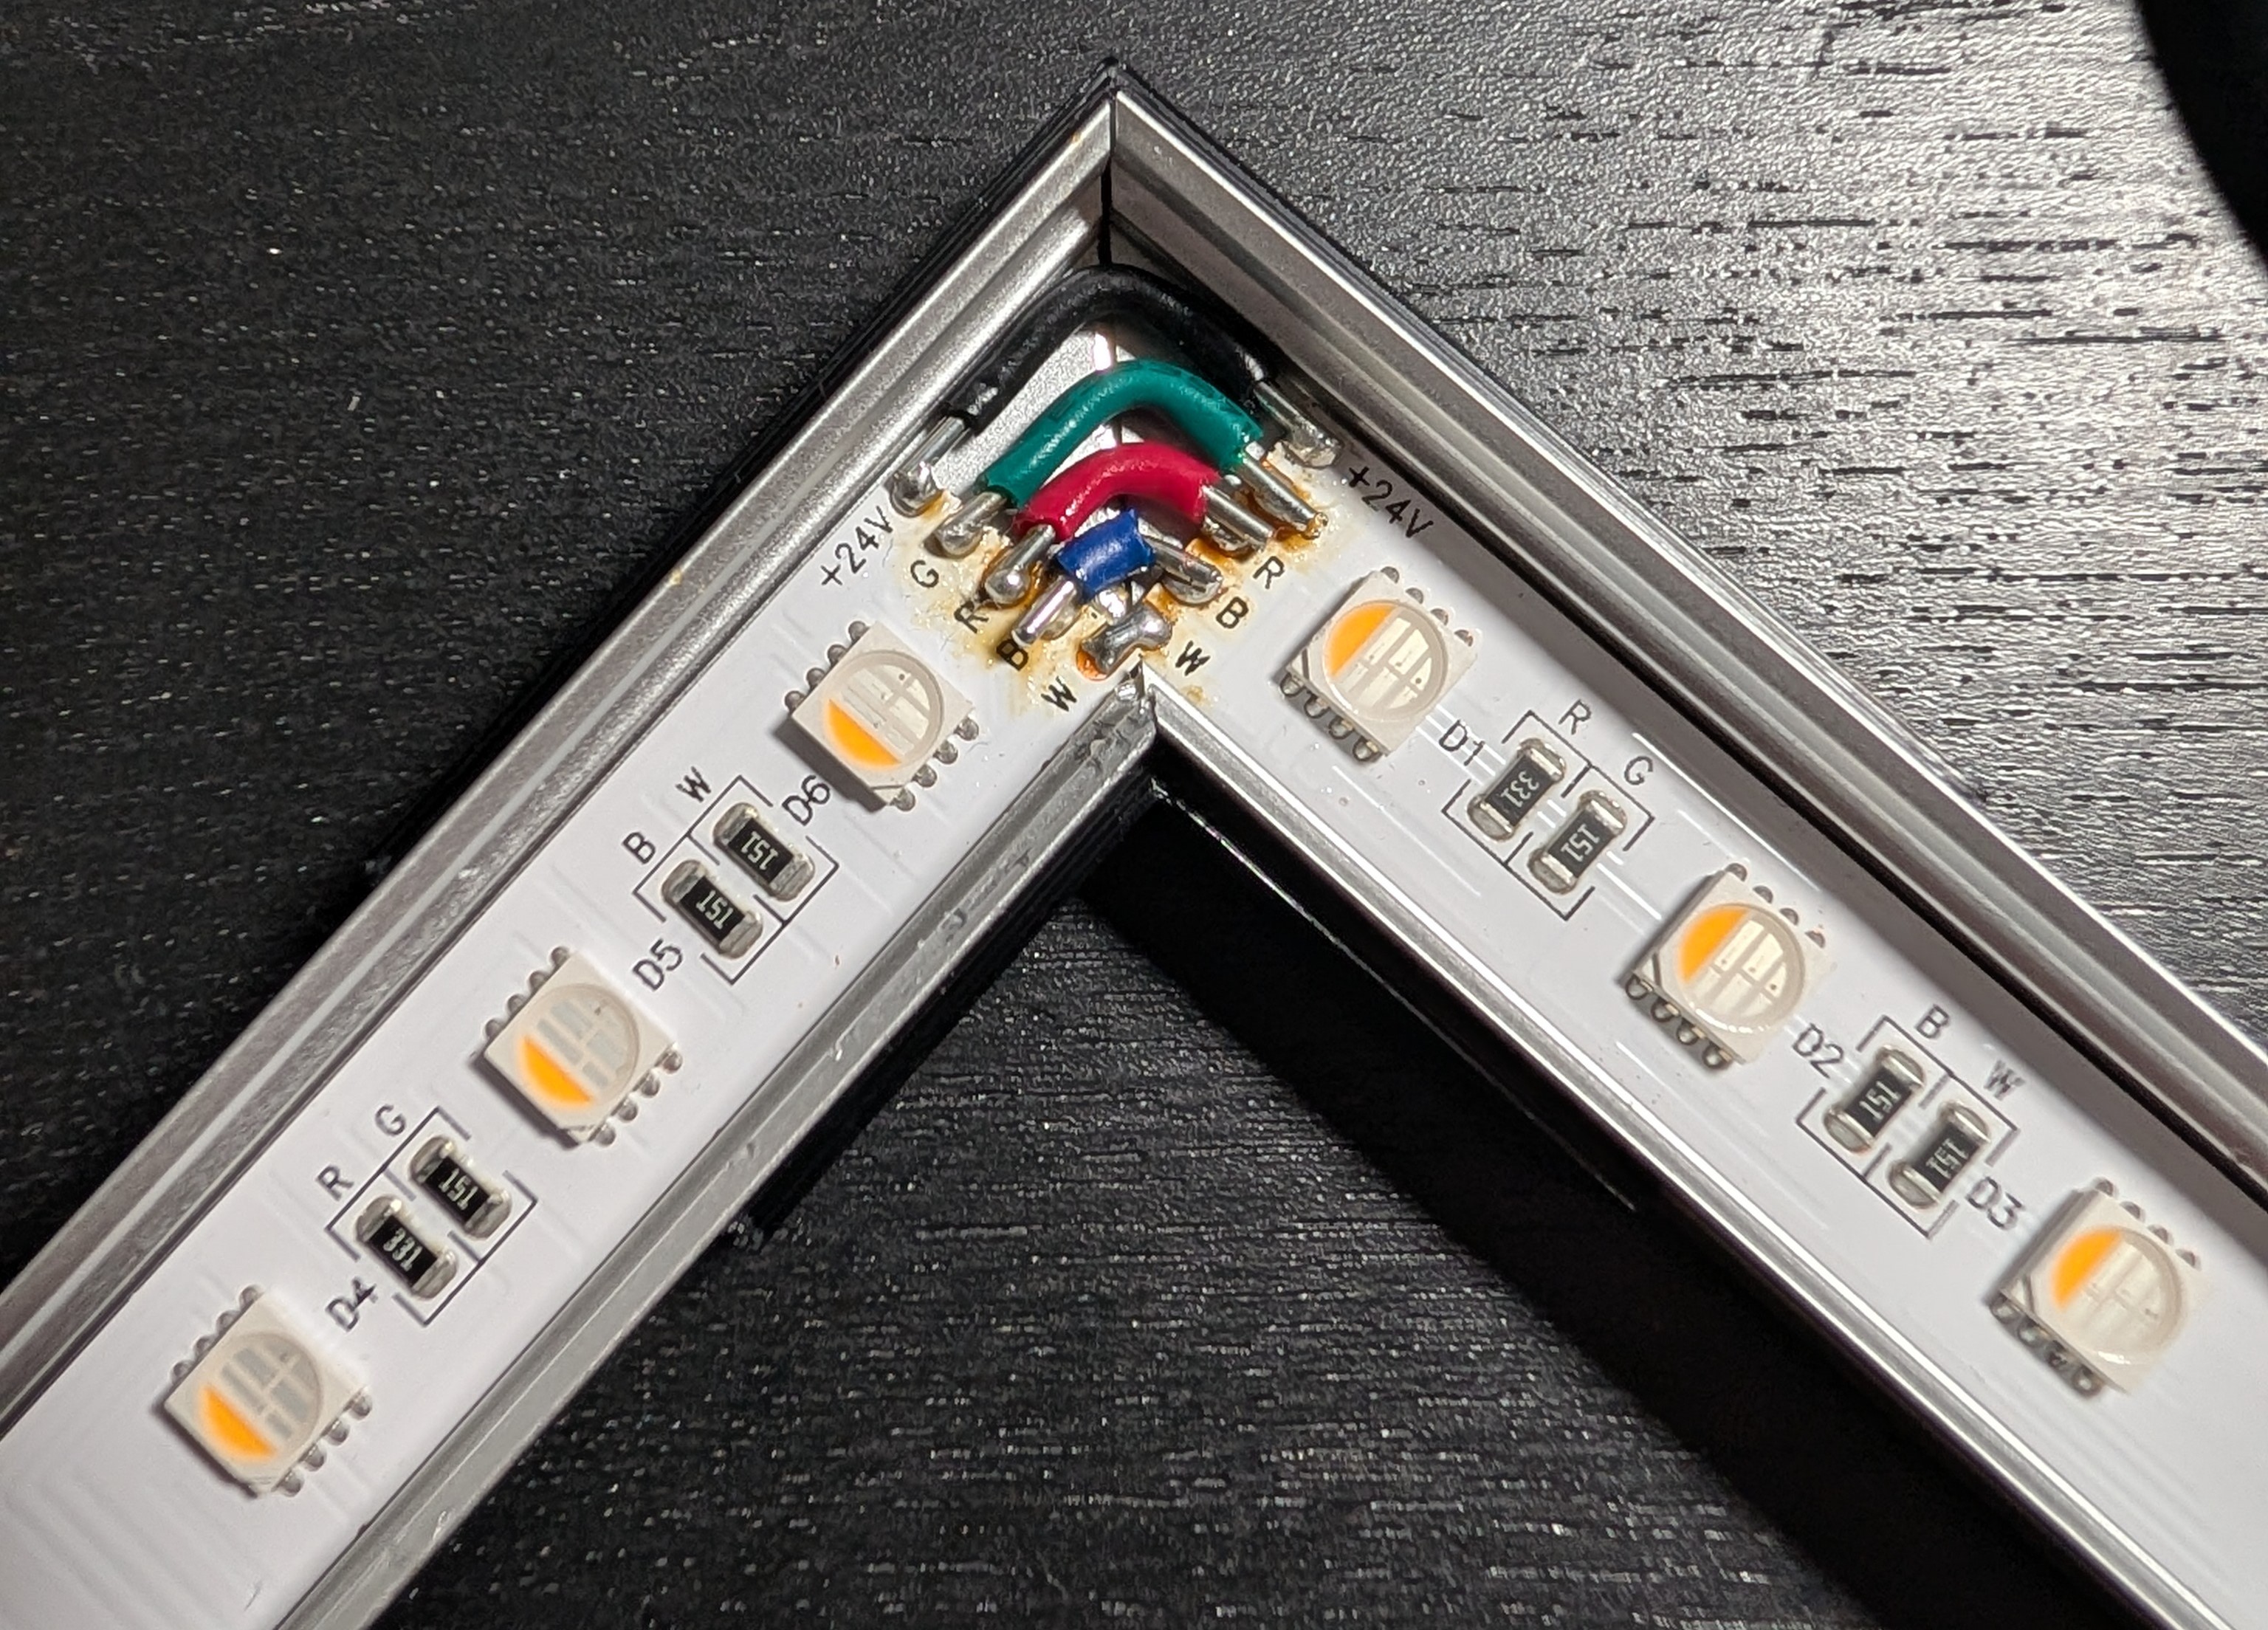
The wire insulation got a lot meltier than I wanted it to, but everything stayed more-or-less in place. Once I had three corners done on each unit, the final corner got the “pigtail” wires which led to a 5-pin GX16 connector. I don’t actually know how well everything would have held up as-is, but because it’ll be a royal pain to actually get the acrylic diffusers off again, I was a bit paranoid about something working loose in the future. I decided to try out potting the corners, which definitely could have gone cleaner.
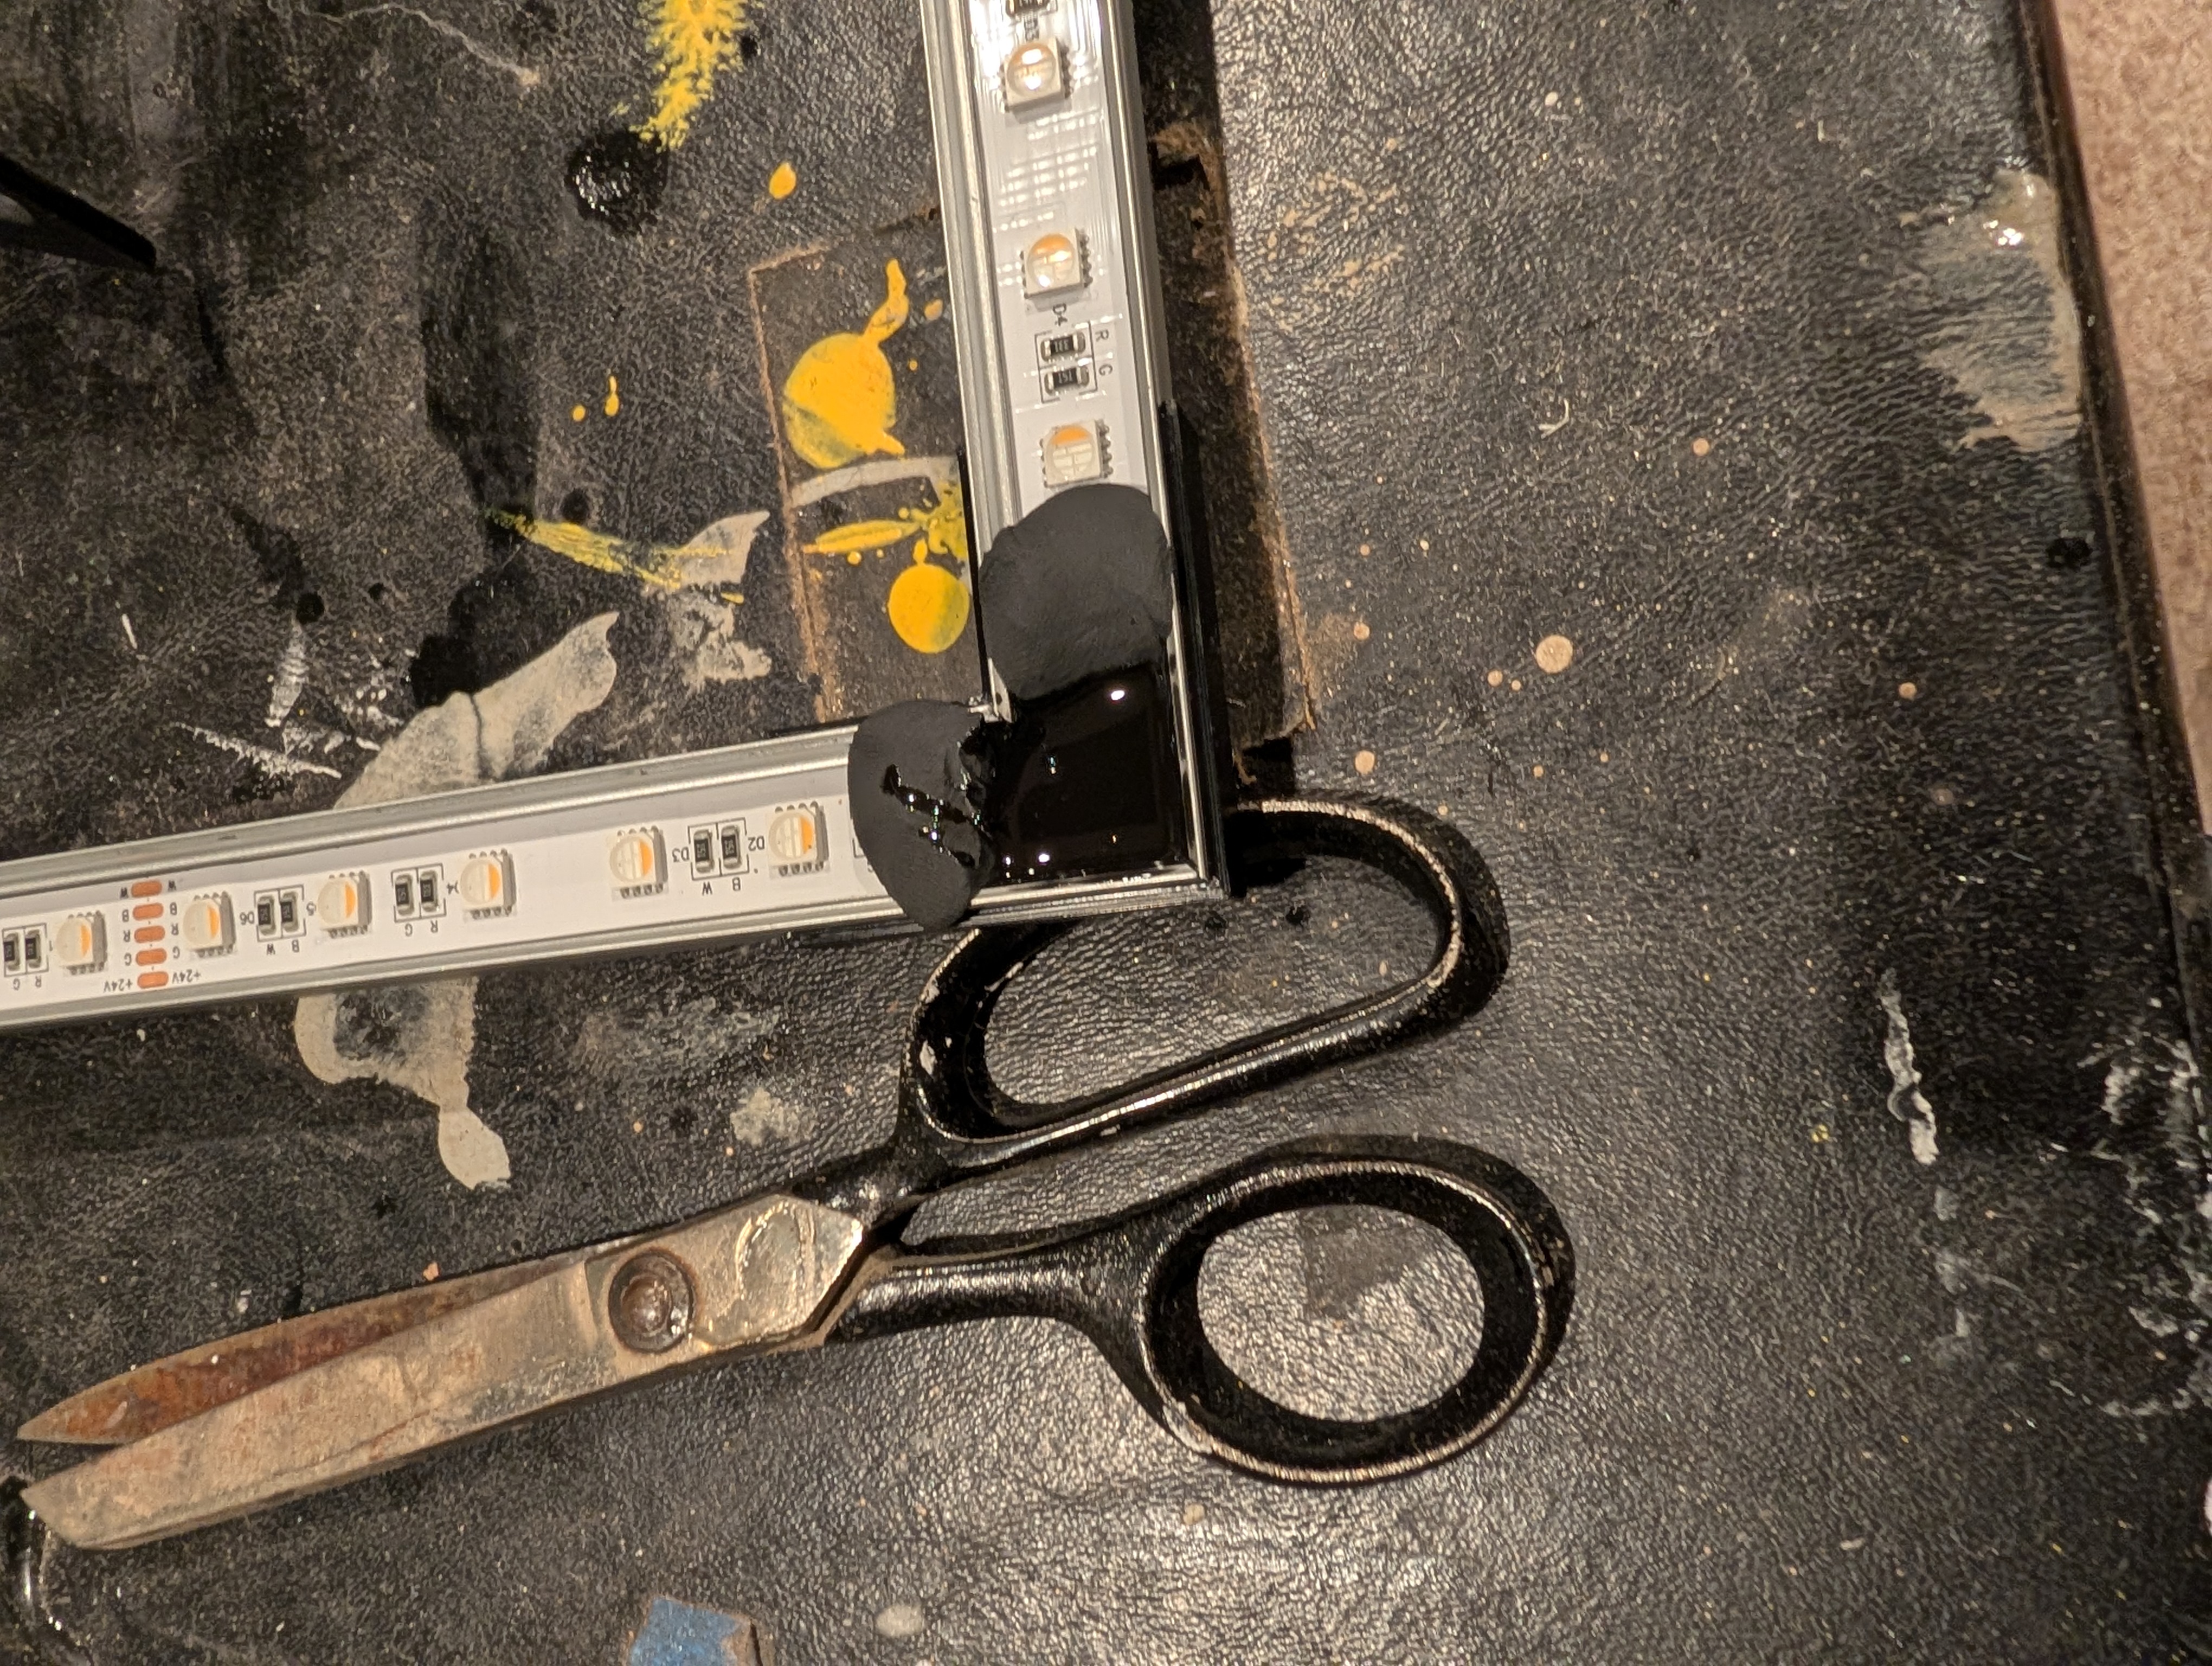
The cheap polymer clay I used as pouring dams didn’t make the best seal - turns out potting compound flows a lot more than I expected - and also actually slightly absorbed some of the resin, so cleaning up after the pour was a bit of an annoying process. With all five frames done, I could start on the control setup.
Fixture Control Hardware
I mentioned QuinLED earlier - it’s a great resource for controllable LEDs, and also my control hardware source of choice. I’ve used their Dig-Uno boards before as a simple self-contained control board for running WLED and handling power. For this project, I had different constraints than my past work:
- I didn’t need per-pixel addressability - per-fixture would be plenty.
- The distances between fixtures were non-trivial (5-10ft isn’t all that far but it’s not “as close as possible”)
- I had five fixtures to address.
No per-pixel addressability meant I could go with analog LEDs instead of WS281x digital LEDs, which ended up being cheaper for equivalent brightness/color channel count. Going to analog would mean that each fixture would need its own channel, though - but Quin has a neat solution available.
The Dig2Analog breakout board can be connected to a digital controller and behave as a single WS281x digital “pixel”, then drive an entire string of analog LEDs. With one Dig2Analog board per fixture, I could daisy-chain fixtures and make my cable routing easier while still getting per-fixture control. Next up: five breakout boxes, each with a Dig2Analog board and three GX16 connectors - two three-pin connectors for power and digital data, and one five-pin connector for the LED strip itself.
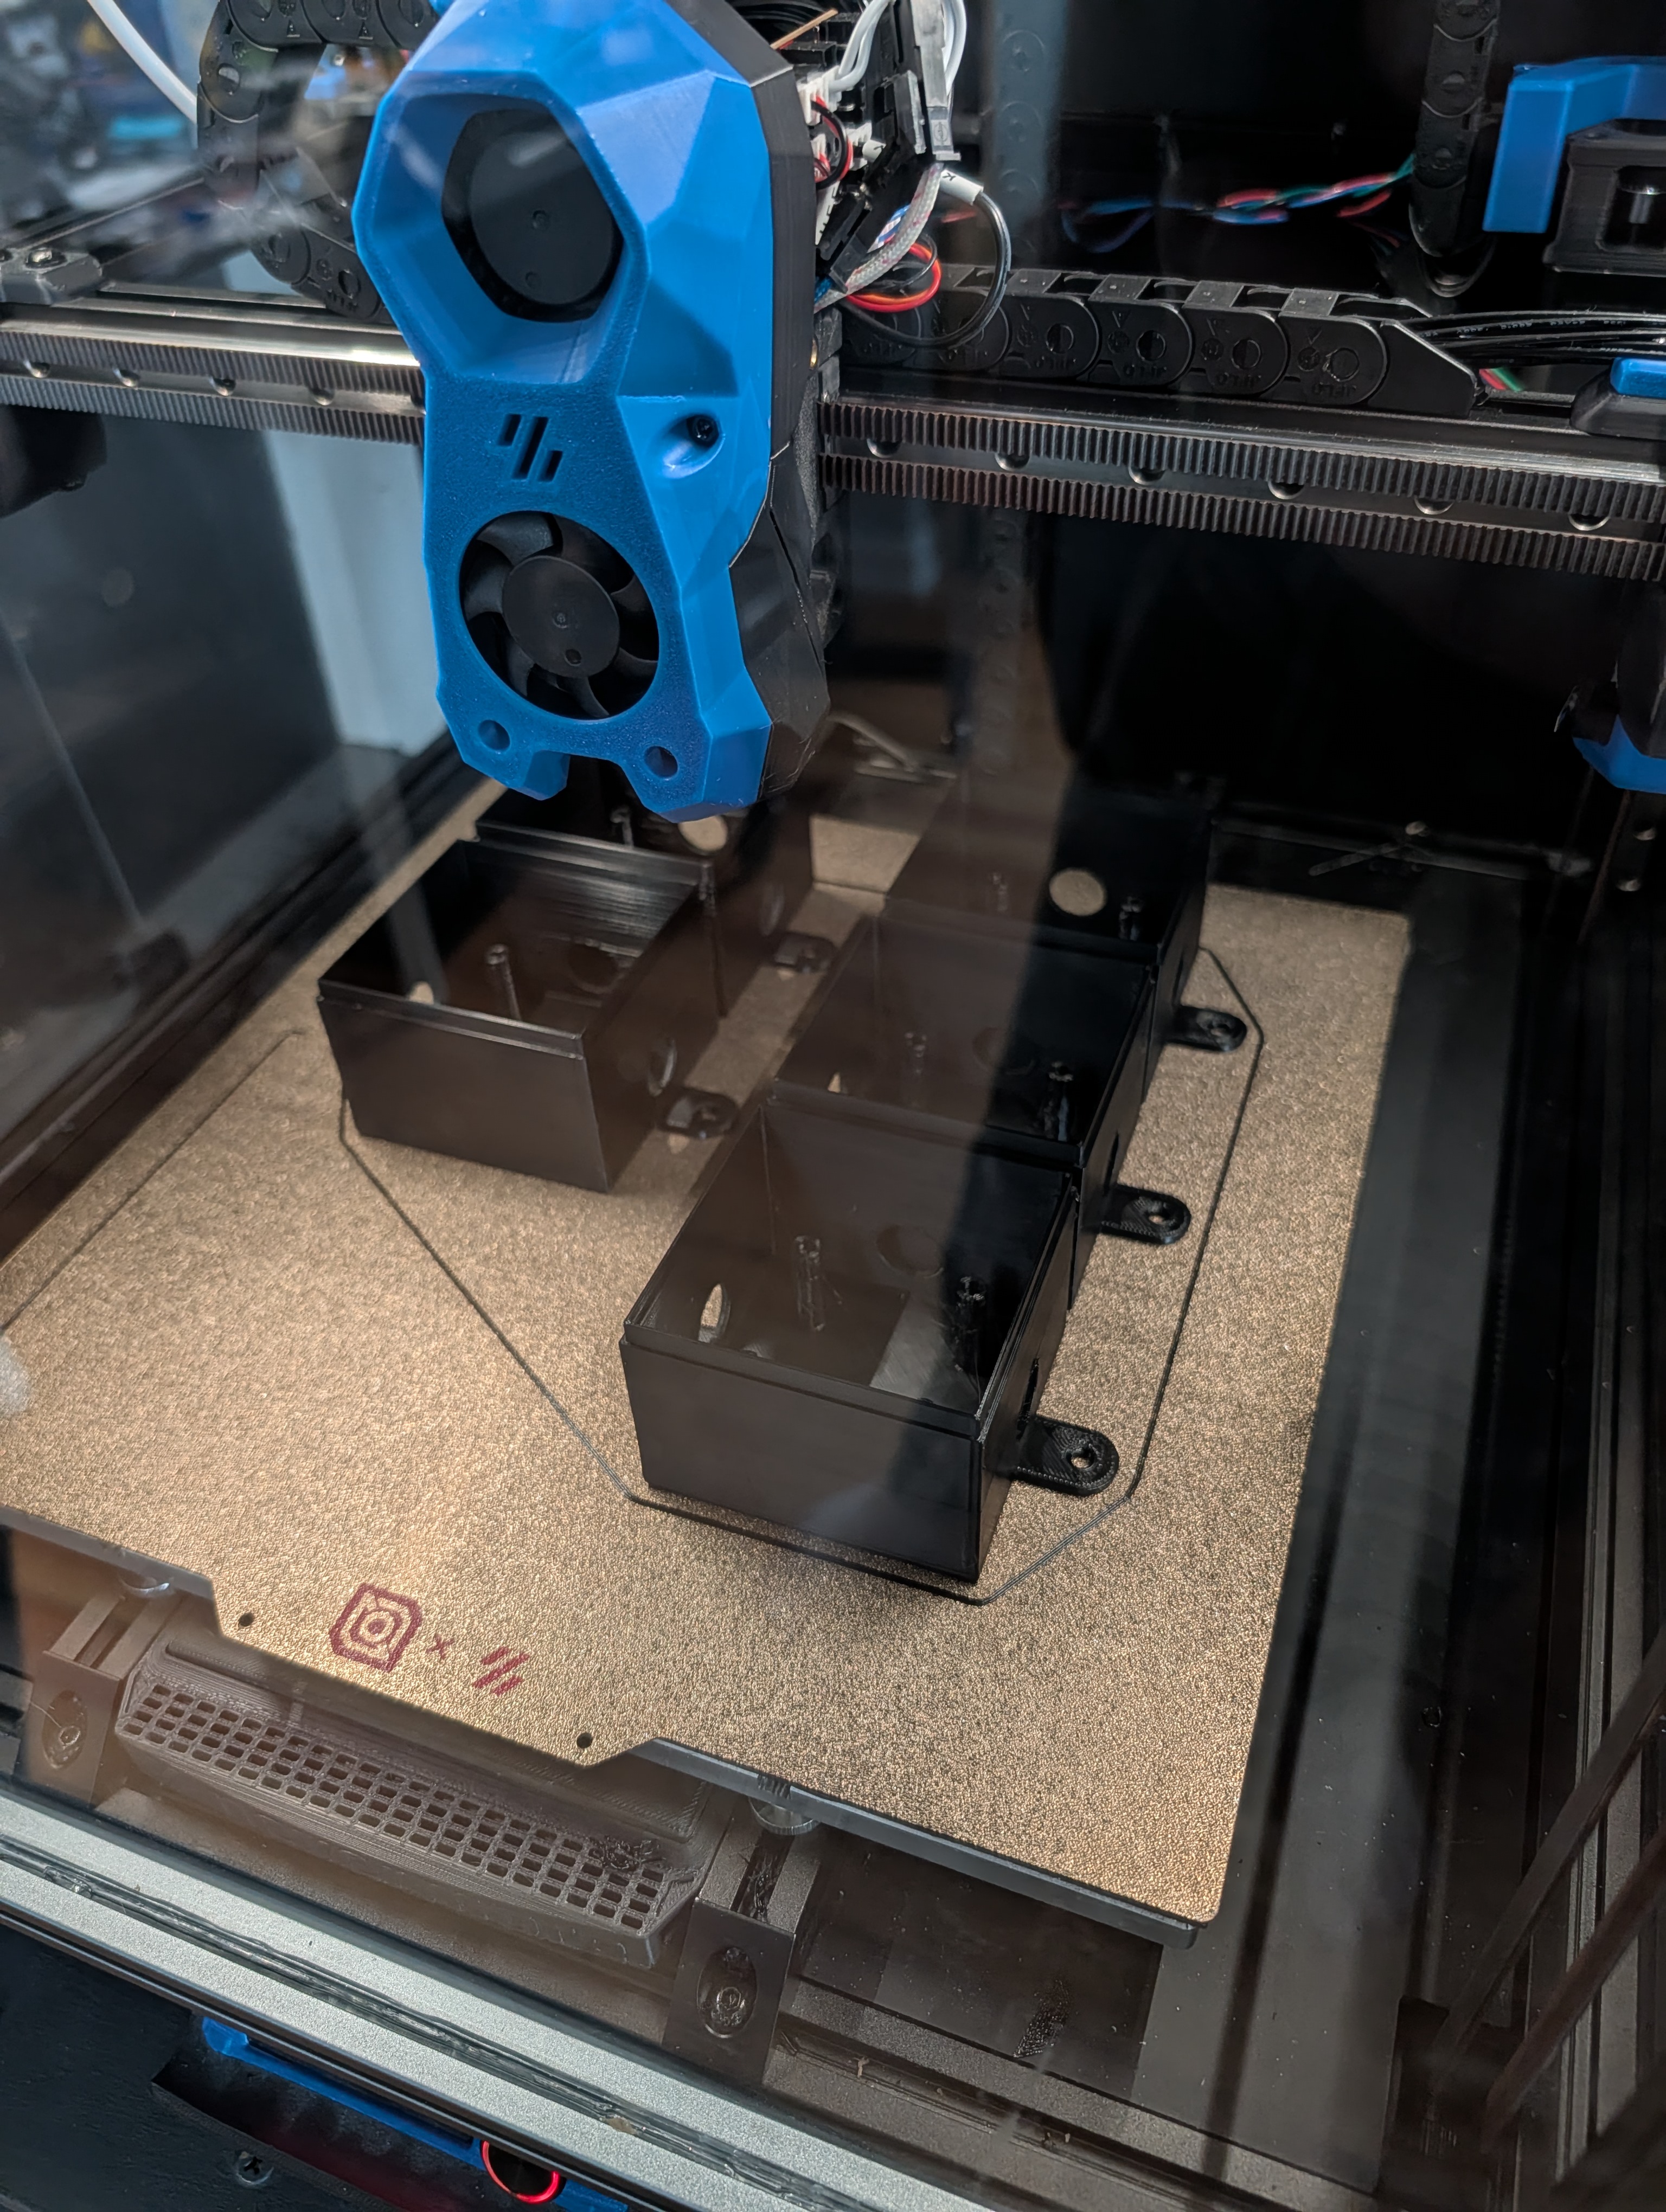
All printed parts were done on a Voron 300x300 in ABS
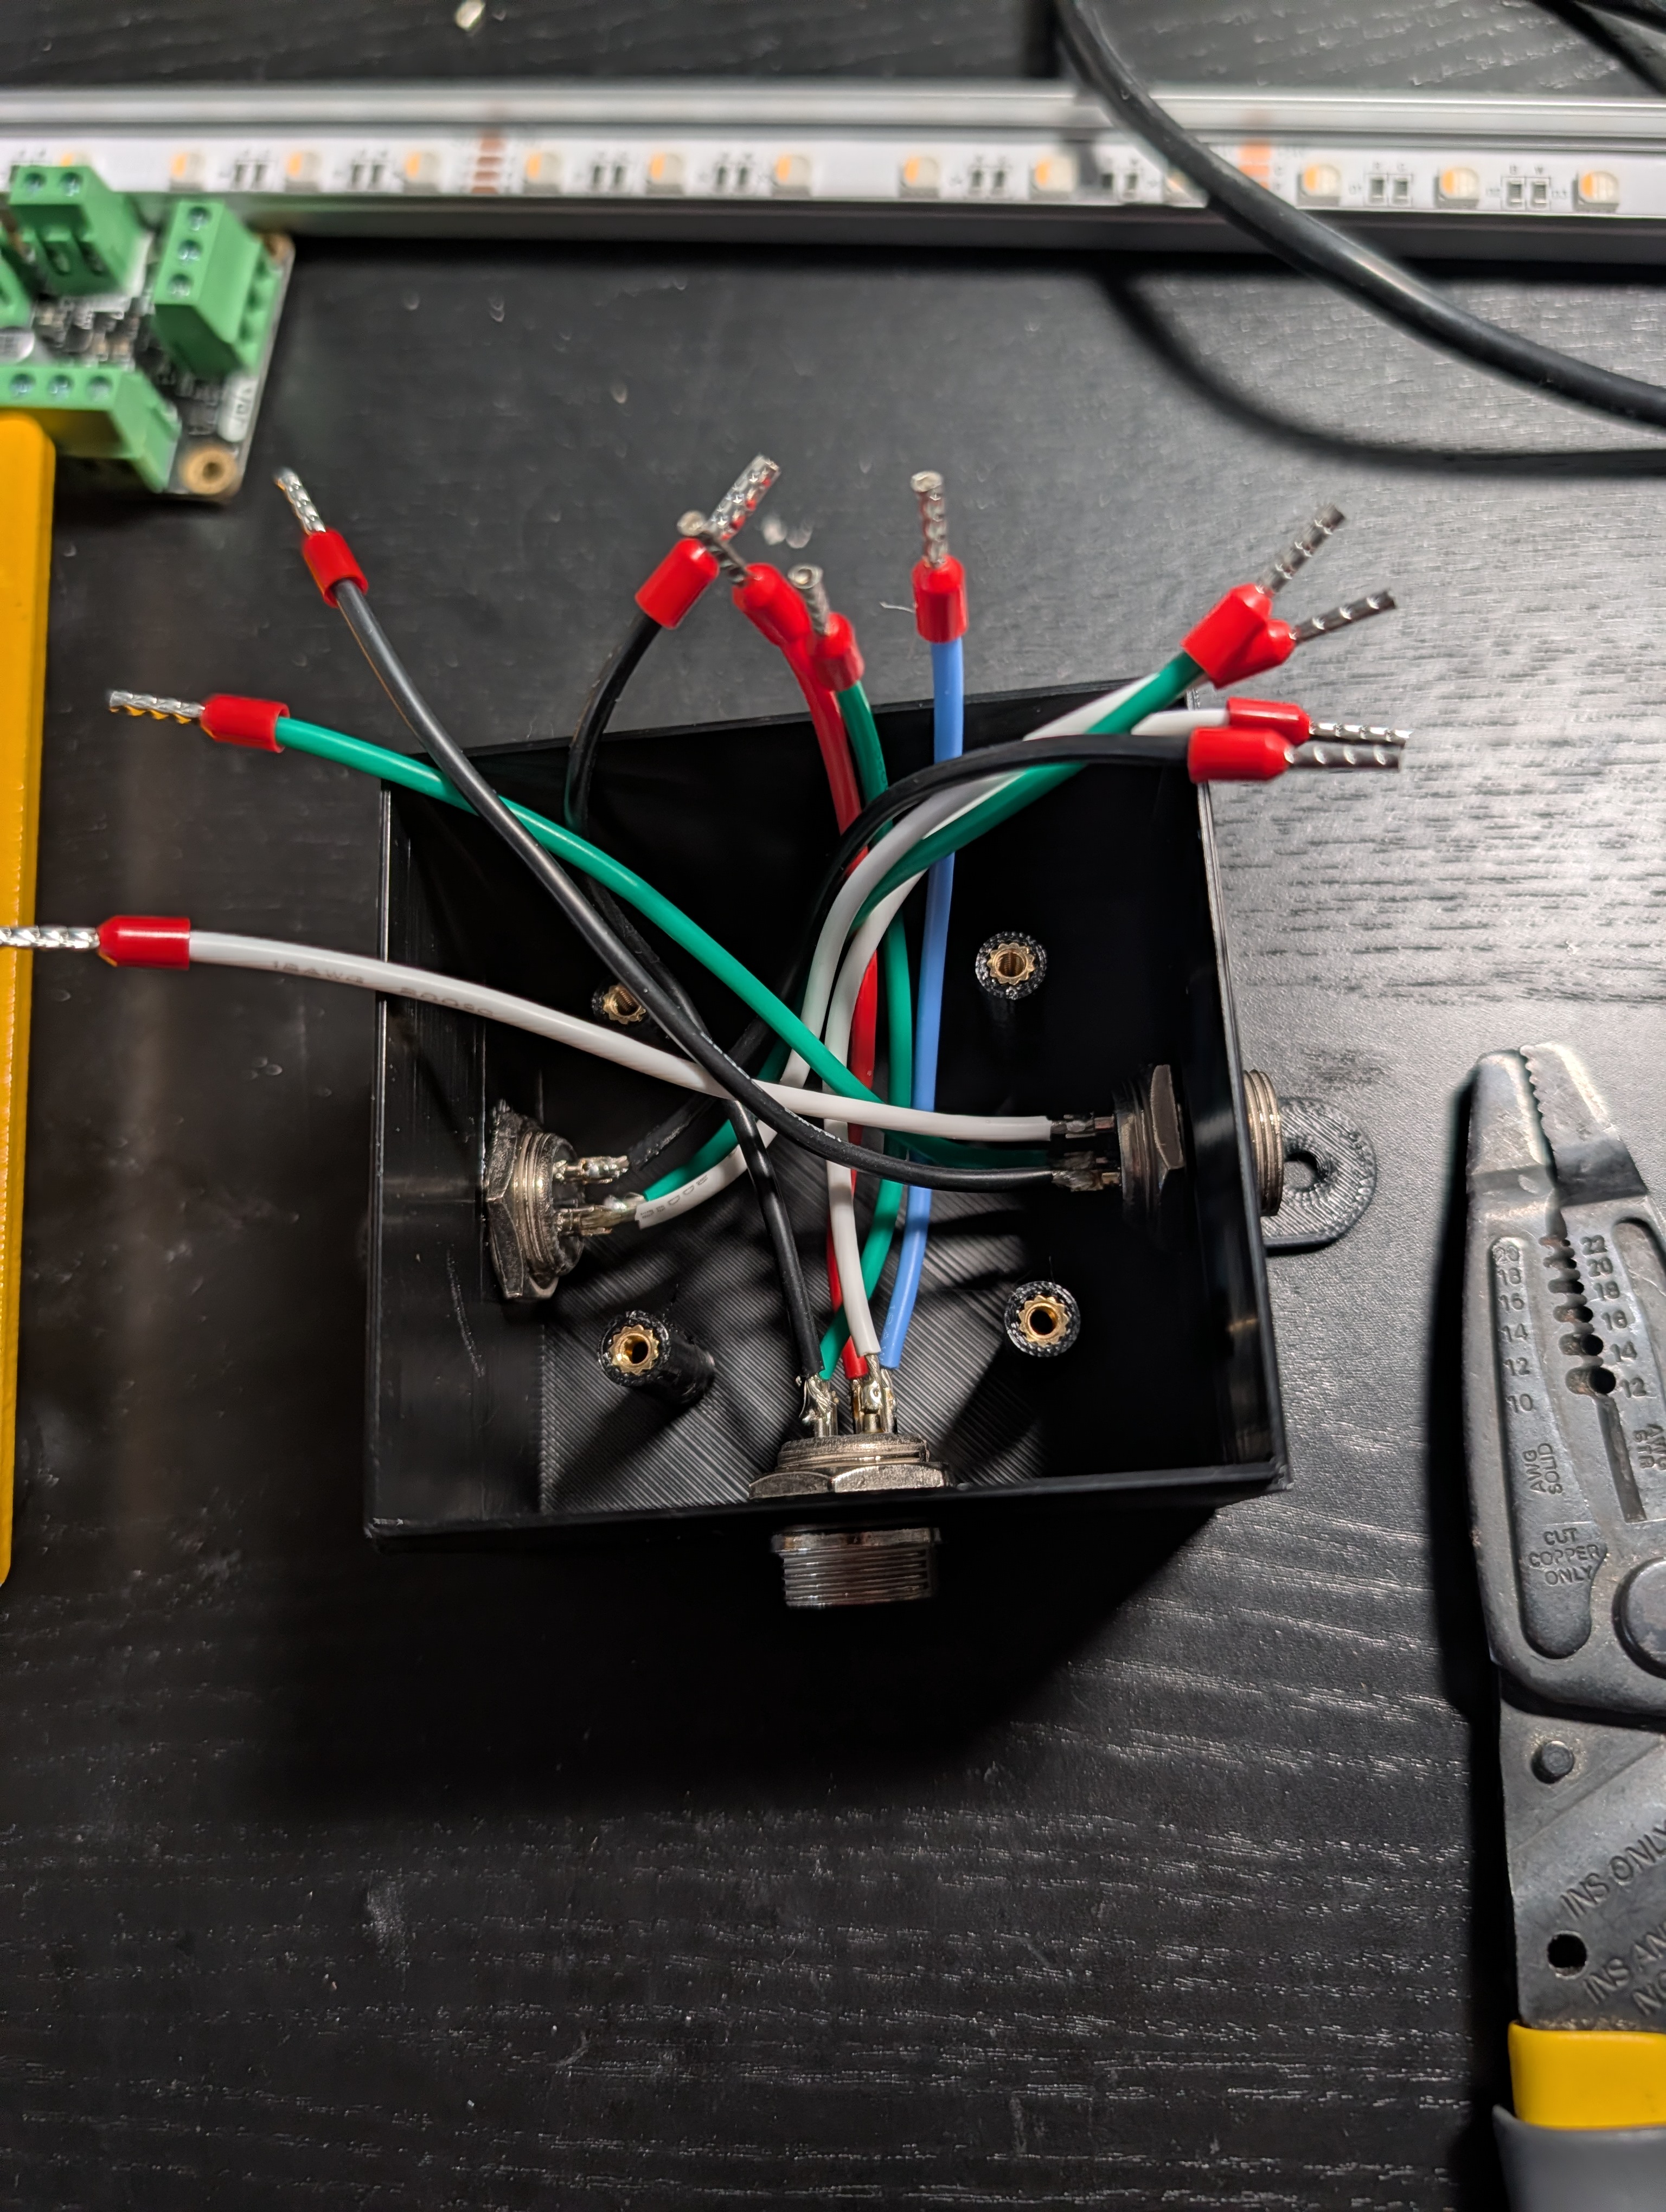
I put the GX16 connectors below the board so I could do the wiring, then neatly set the board on top
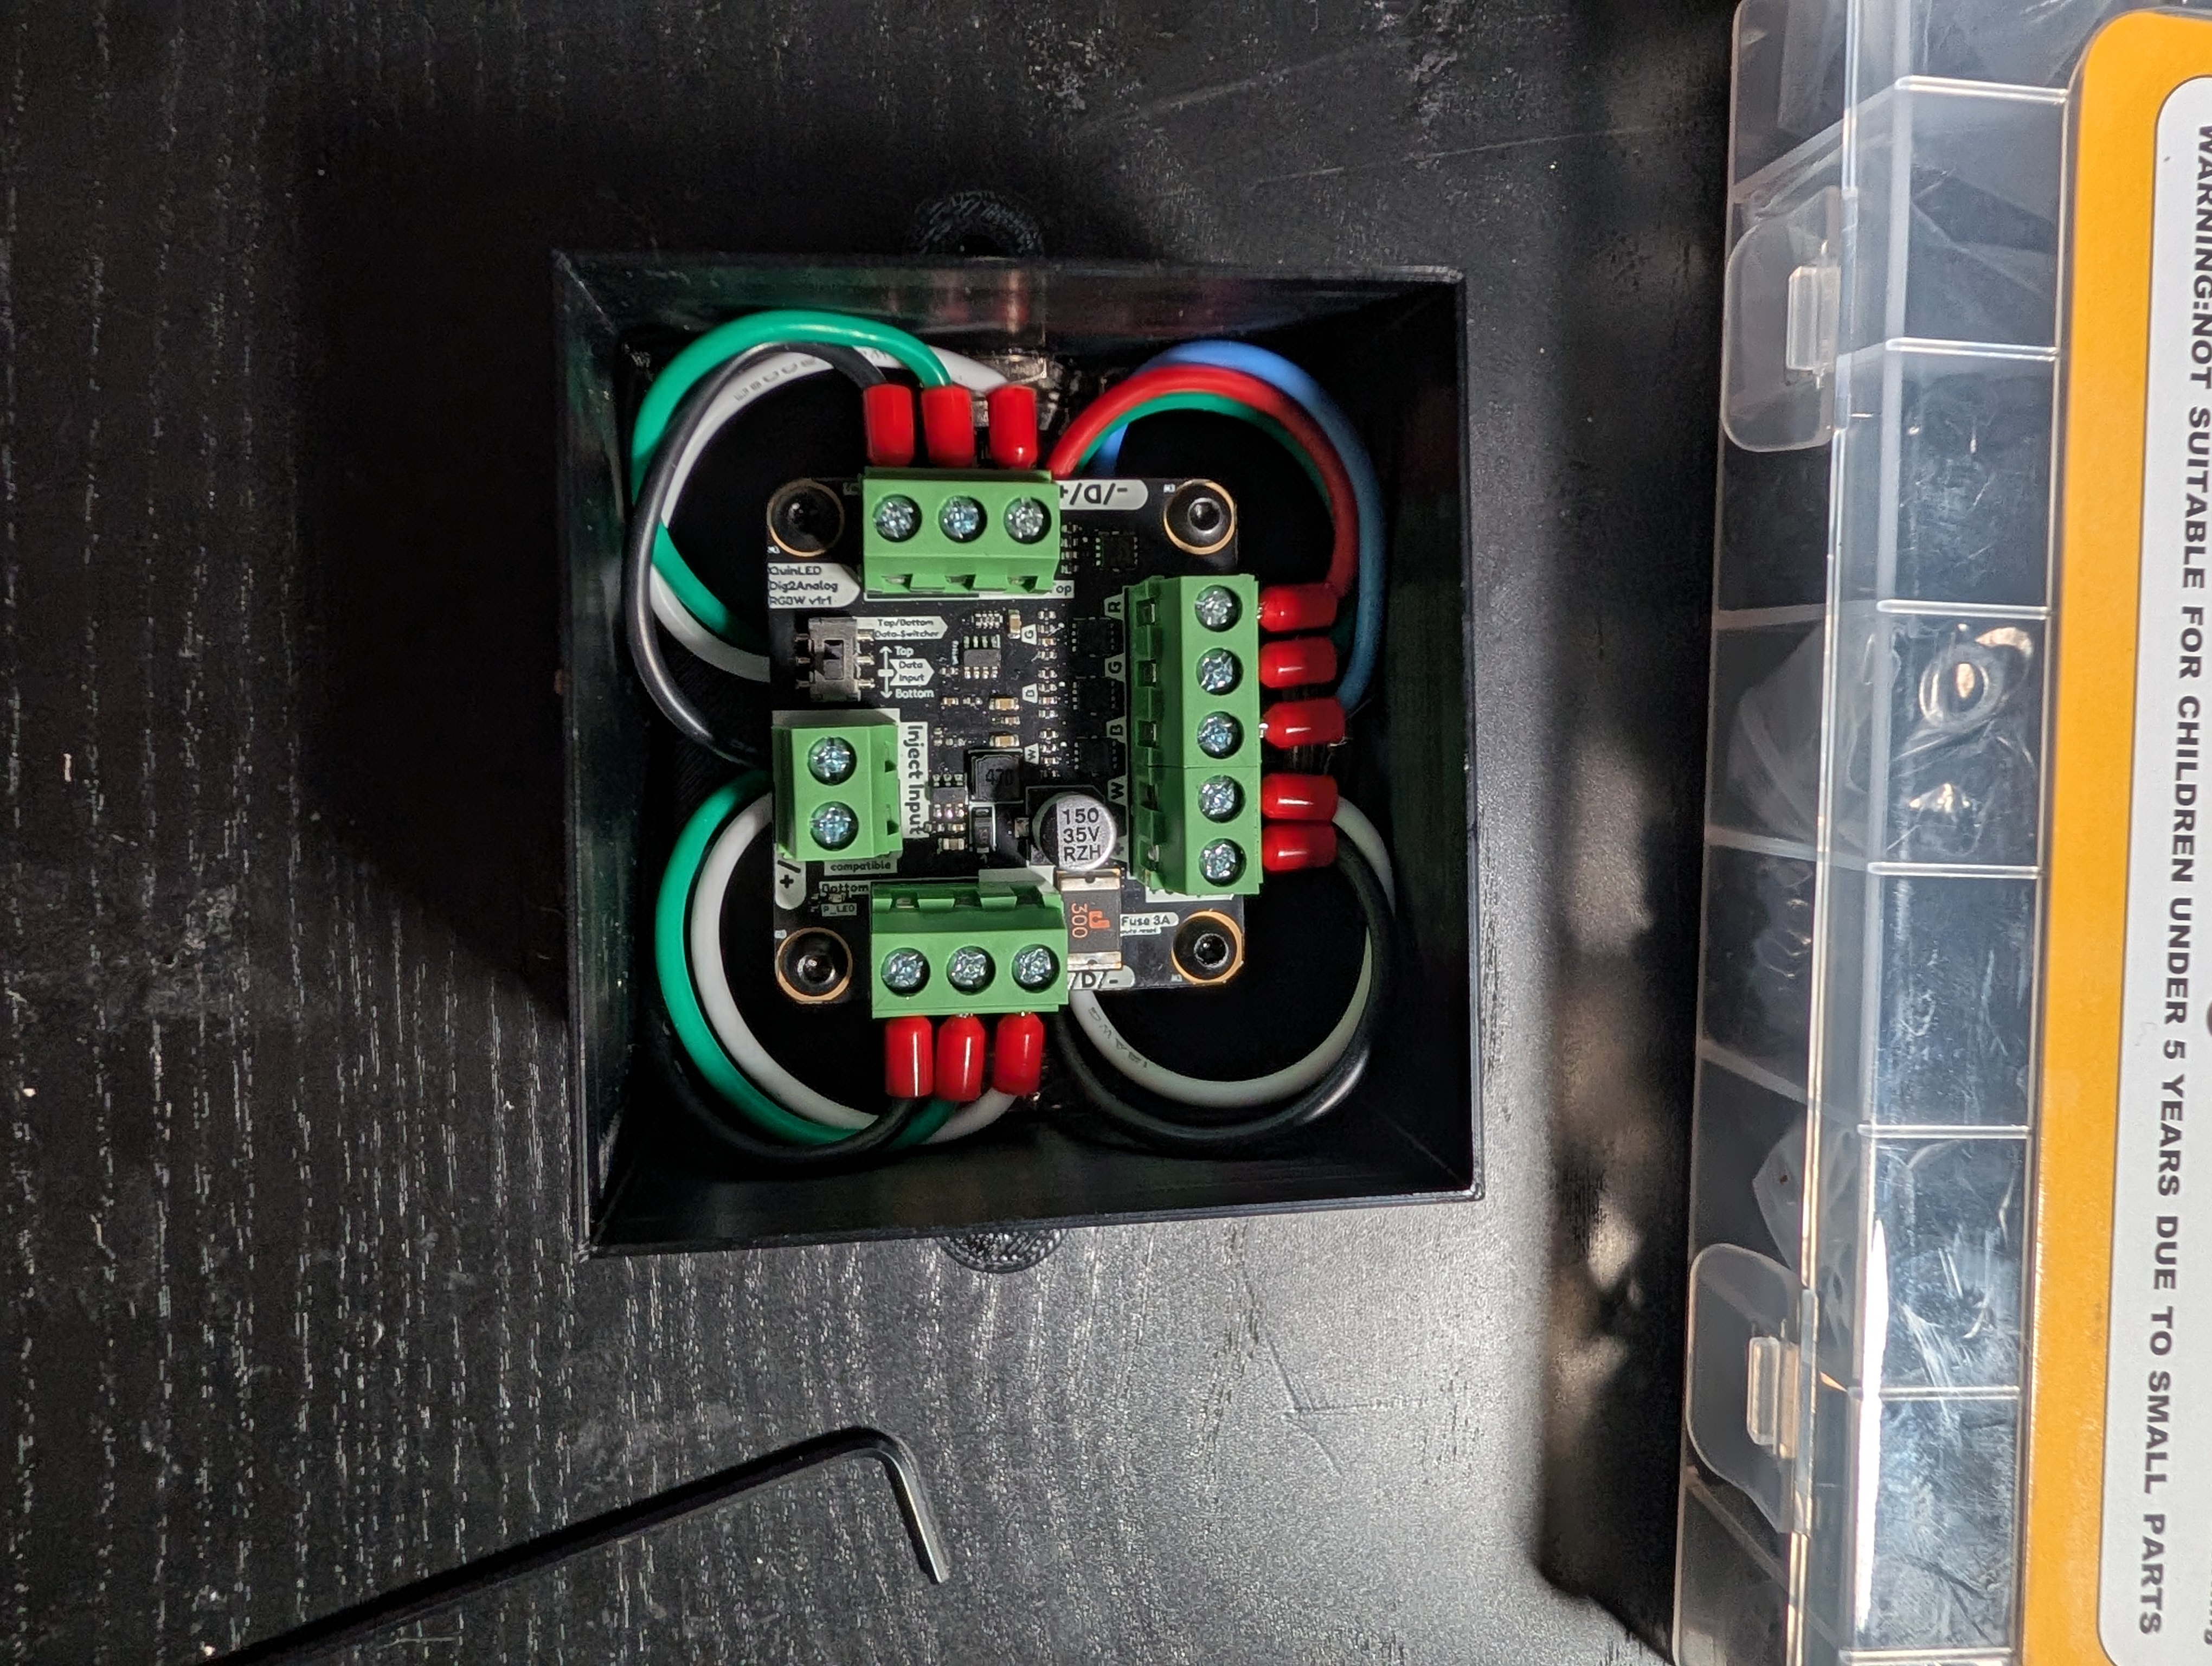
These ended up being very satisfying objects in their own right
Main Control Hardware
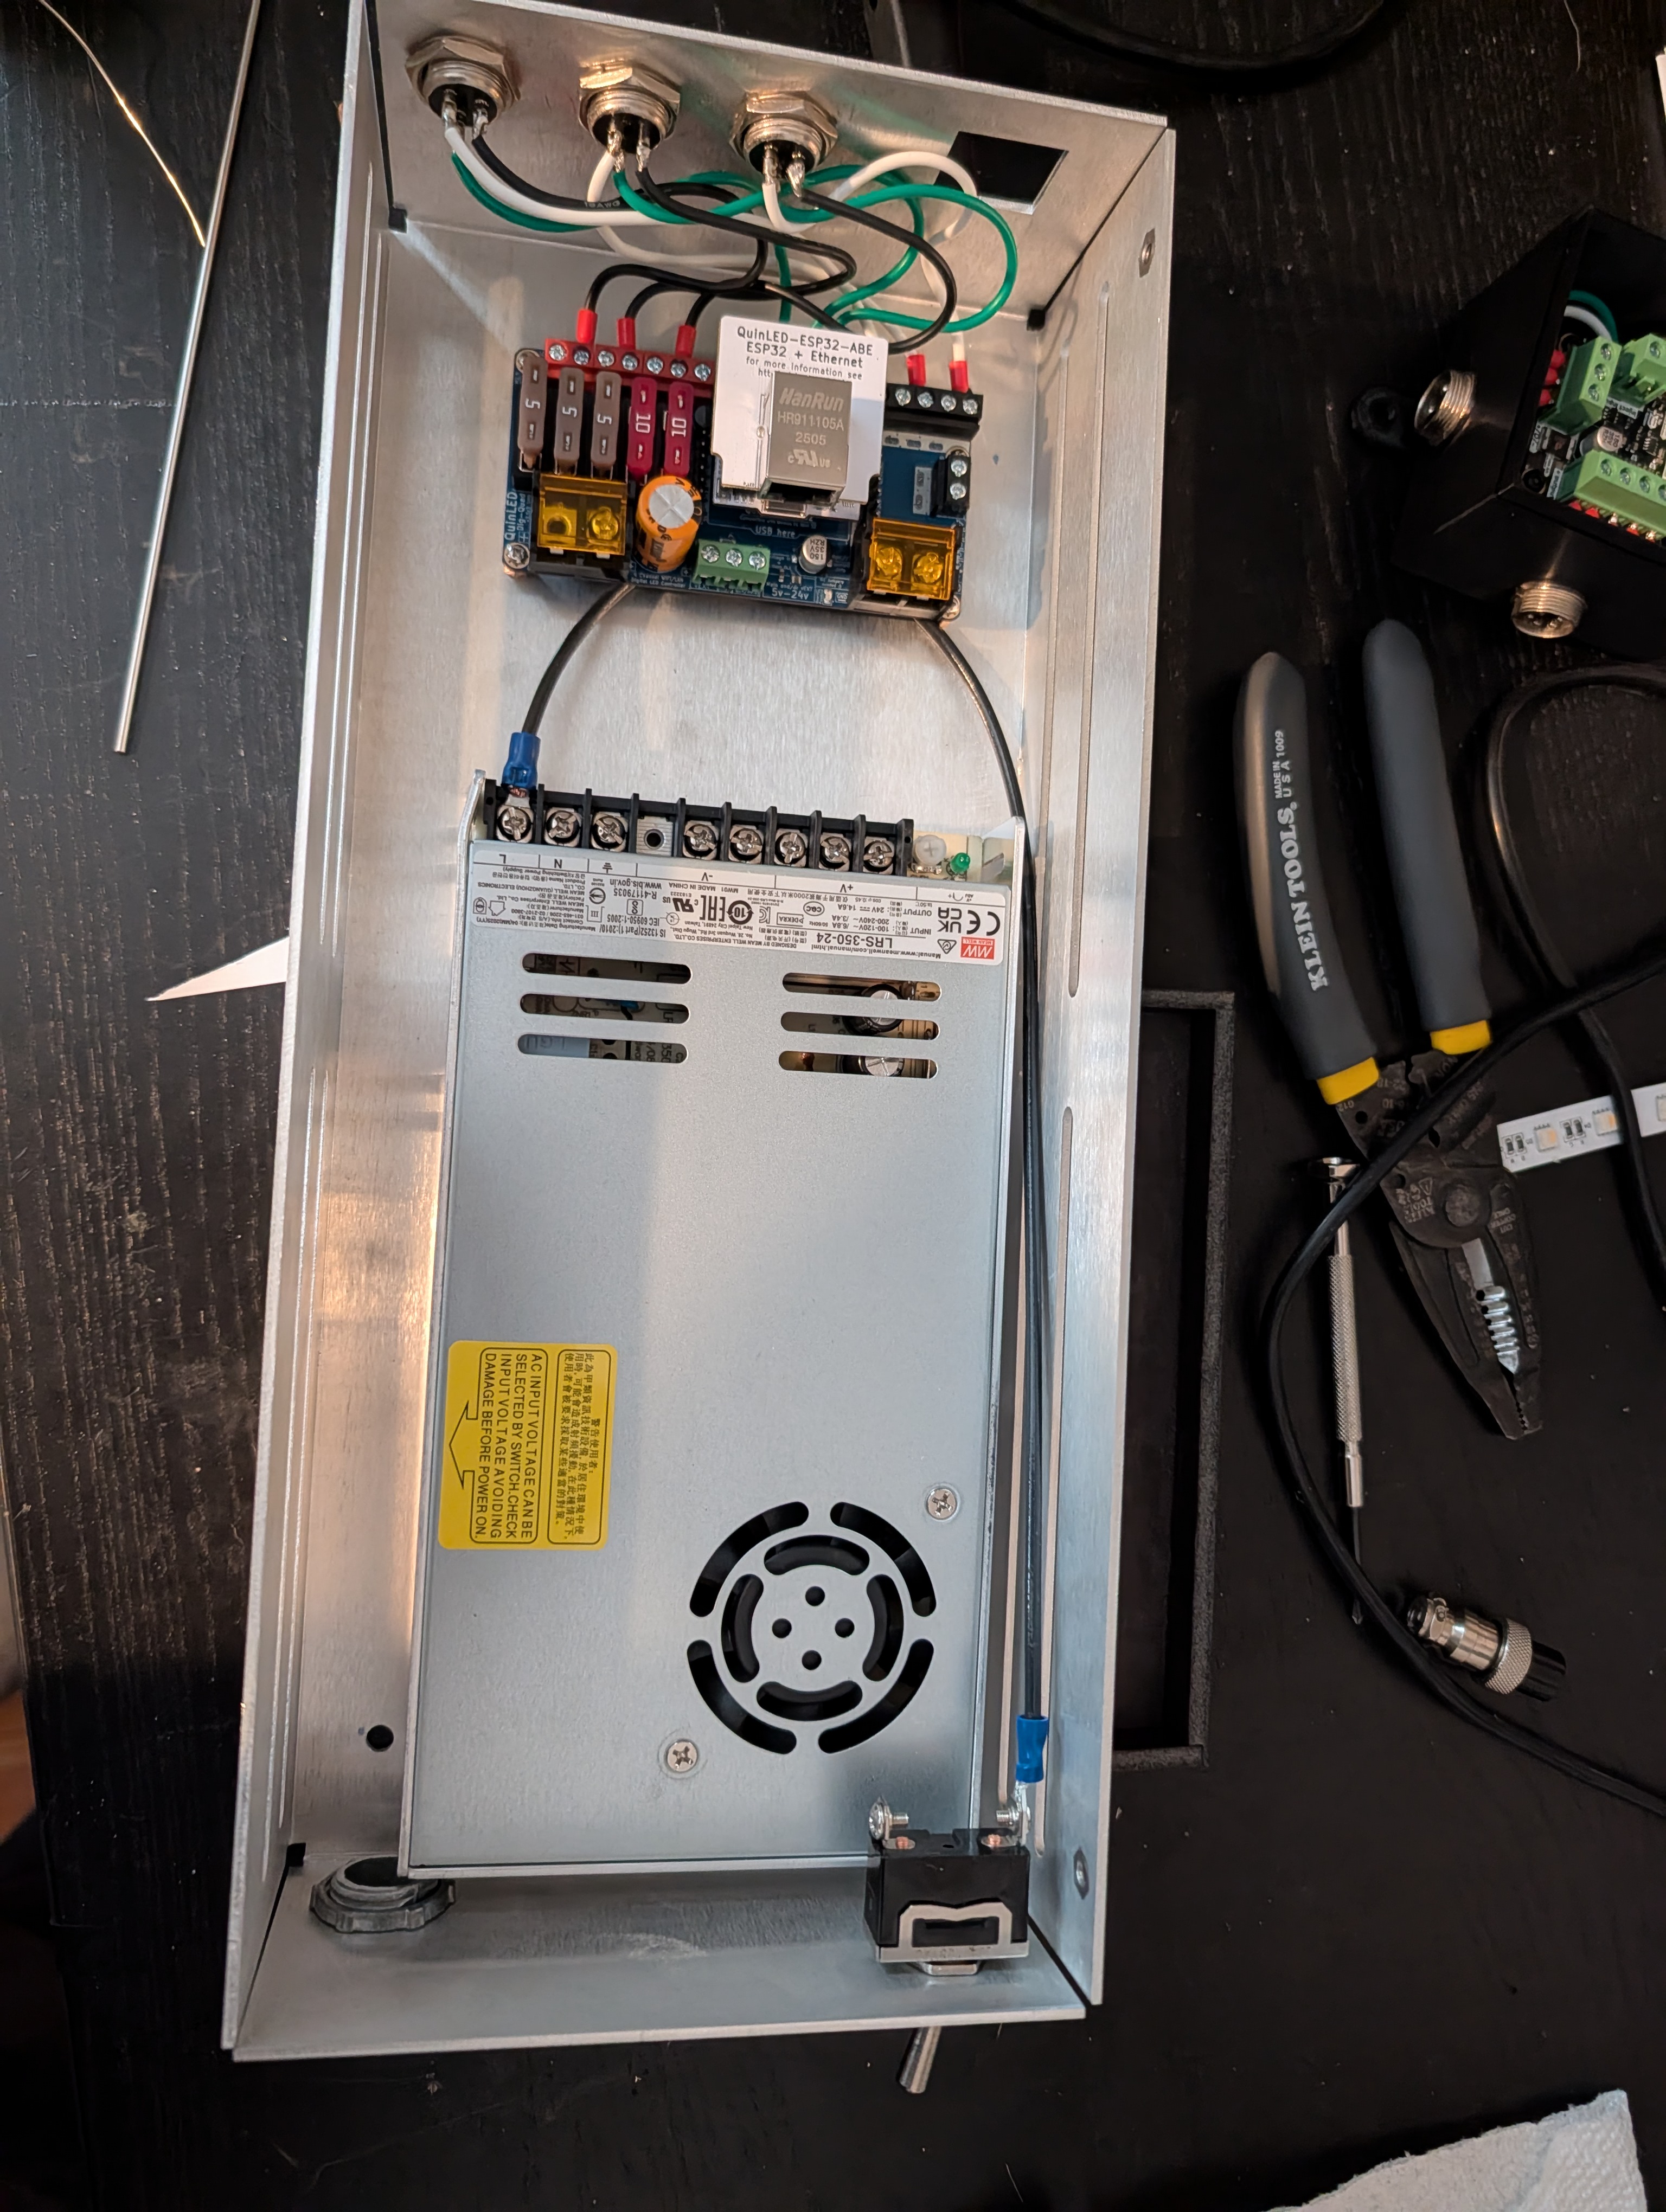
The last piece to make was the main power and control setup. The control board is a Dig-Quad board running WLED on an ESP32 and providing 24v power and data to three channels, and power is from a Mean Well LRS-350-24 power supply. Given that this would be permanently mounted above a drop ceiling and hard-wired into mains power, I wanted to get as close as I could to actually following code - and in the Chicago area, that means metal boxes and conduit for everything (and that’s a great decision and I will fight you on this), so I needed to make a custom enclosure.
Aluminum fabrication is a bit outside of my wheelhouse, so I outsourced this piece to SendCutSend, which was a nice and easy process. They provided presets for Fusion so I could just make the overall geometry and let the tool calculate the necessary bend radius and corner cuts. Once it arrived, I got everything mounted - power supply and control board on standoffs, a coupler for conduit, three outputs, a main power switch, and a slot for an Ethernet jack to hard-wire the control board (I still haven’t run the Ethernet cable…)
Installation and What’s Next
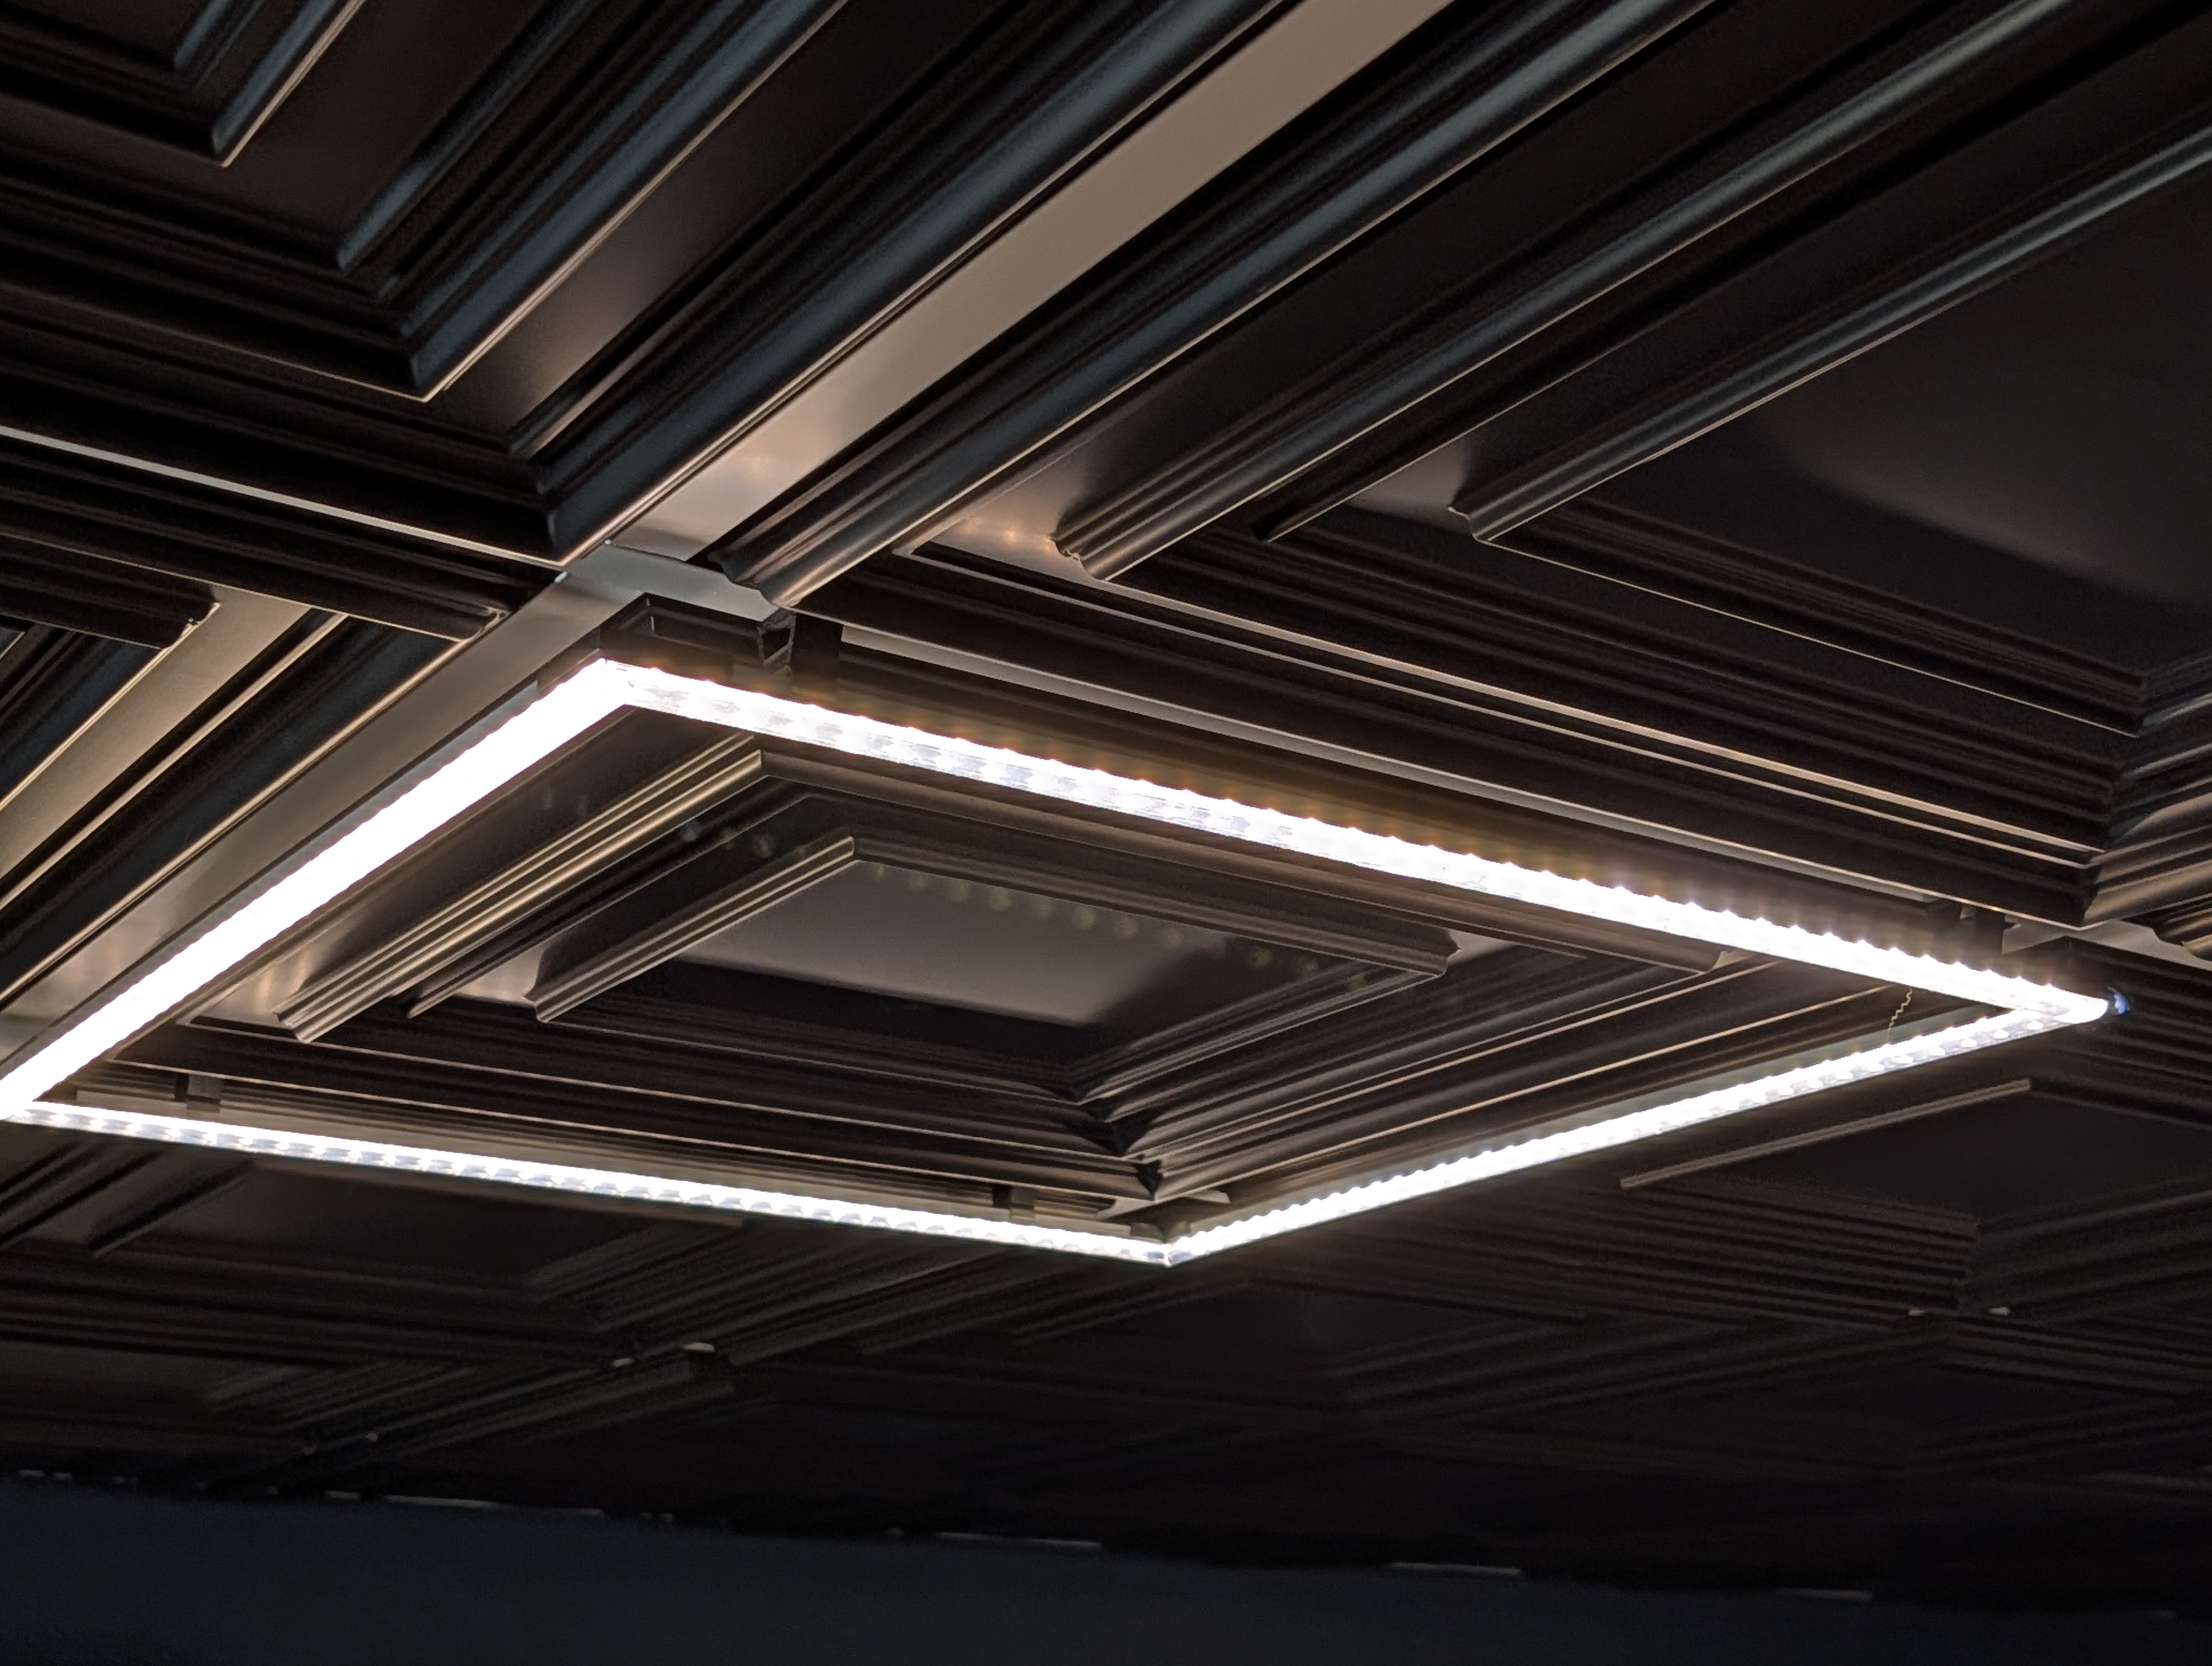
I printed some simple brackets to snap onto the ceiling grid and hold a mounting clip for the aluminum channel, which also served to give the whole assembly a bit more air circulation to keep temps down. The fixtures snapped right into place and I mounted all the control hardware to the basement ceiling joists.
The actual control can be done through the WLED web interface, but also integrates into our Home Assistant setup and can be controlled by the upstairs light switch via Z-Wave relaying through HA.
Overall I’m extremely pleased with how these came out. They look like they’re meant to fit in with the rest of the ceiling setup, and do a great job of lighting up the space while also being a satisfying object in their own right.
There are a lot more possibilities in terms of lighting control (especially integrating with the TV setup for things like “automatically dim the light above the TV when it’s turned on”) but those will have to wait until the rest of the basement finishing work is done. Finally, much further down the line, there will probably have to be some sort of “Push button, receive fancy color-changing lights” setup, if only because it will amuse me when hosting friends.